DIY Pomegranate Kombucha: Simple Steps to a Gut-Friendly Brew
Are you tired of buying expensive kombucha from the store, or simply curious about the magic of fermentation? Imagine crafting your own tangy, effervescent, and incredibly gut-friendly beverage right in your kitchen. Learning
how to make homemade kombucha DIY pomegranate style is not only surprisingly easy but also incredibly rewarding. This comprehensive guide will walk you through every step, from brewing your first batch to infusing it with the vibrant, antioxidant-rich flavor of pomegranate, ensuring a delicious and healthy drink every time.
Many products on the market claim to boost gut health, but often, the beneficial probiotics don't survive the manufacturing process or their journey to your digestive system. By brewing your own kombucha at home, you gain complete control over the ingredients and fermentation, ensuring a fresh, potent, and truly beneficial elixir. While the internet can feel like a rabbit hole of confusing information for first-time brewers, we're here to simplify the process and equip you with the knowledge to brew with confidence.
Understanding the Essentials: What is Kombucha, SCOBY, and Starter Liquid?
At its heart, kombucha is a tea-based fermented drink. Its distinctive tartness, subtle sweetness, and natural fizz come alive through a fascinating fermentation process, which also imbues it with its renowned gut-friendly properties. It's a fantastic, healthier alternative to sugary sodas and an excellent way to introduce beneficial microbes into your diet. While fermentation does produce trace amounts of alcohol, it's typically less than 1%, making it a non-alcoholic beverage for most purposes.
To embark on your
homemade kombucha DIY pomegranate journey, you'll need to familiarize yourself with two key terms: SCOBY and Starter Liquid.
*
What is a SCOBY? SCOBY stands for "Symbiotic Culture Of Bacteria and Yeast." This isn't just a fancy name; it's literally a living pancake-like culture that performs the magic of fermentation. Visually, a SCOBY can be a little unsettling – it's a rubbery, disc-shaped, off-white or brownish mass, often with stringy bits hanging from it. While it might look a bit alien, it's the heart and soul of your kombucha, responsible for transforming sweet tea into a probiotic powerhouse. A healthy SCOBY will continue to grow and produce new layers with each batch, often referred to as "baby SCOBYs" or "SCOBY hotels."
*
What is Starter Liquid (or Starter Tea)? Just as important as the SCOBY is the starter liquid. This is simply a portion of previously brewed, unflavored kombucha. It's crucial because it provides the initial acidic environment needed to kickstart fermentation and protects your new batch from undesirable molds or bacteria. It's teeming with the beneficial bacteria and yeasts that your SCOBY needs to thrive. Think of it as the friendly microbes' jumping-off point for a successful brew.
It's vital to note a quick public service announcement here: while properly prepared
homemade kombucha DIY is incredibly beneficial, over-fermented or contaminated batches can pose health risks. Always prioritize cleanliness and pay attention to the signs of a healthy vs. unhealthy brew. Don't worry, we'll cover key safety tips to ensure your brewing experience is always positive.
Why Pomegranate? The Flavor and Health Powerhouse
When it comes to flavoring your
homemade kombucha DIY, the possibilities are endless. However, pomegranate stands out not just for its exquisite taste but also for its impressive health benefits. Pomegranate offers a unique blend of sweet, tart, and slightly astringent notes that perfectly complement the natural tang of kombucha. The result is a vibrant, ruby-red brew that's as beautiful to look at as it is delicious to drink.
Beyond its captivating flavor, pomegranate is a nutritional powerhouse. The rich, juicy seeds are loaded with:
*
Antioxidants: Pomegranates are packed with powerful antioxidants, even more so than green tea or red wine. These compounds help combat free radicals in the body, protecting cells from damage and reducing inflammation.
*
Vitamins and Minerals: They are a good source of Vitamin C, Vitamin K, folate, and potassium, all essential for overall well-being.
*
Immunity Boost: The combination of antioxidants and vitamins can significantly strengthen your immune system, helping your body ward off illnesses. For more insights on this topic, check out our related article:
Boost Immunity with Homemade Pomegranate Kombucha: A Health Elixir.
Infusing your kombucha with pomegranate happens during the second fermentation stage (F2), where the natural sugars in the fruit are consumed by residual yeast, creating extra fizz and a burst of flavor. This combination truly makes your
pomegranate kombucha a magical elixir.
Mastering Your Brew: The Step-by-Step DIY Pomegranate Kombucha Recipe
Ready to dive in? Here’s your straightforward guide to brewing fantastic
pomegranate kombucha at home.
Equipment You'll Need:
* Large glass jar (1-gallon or 3.8-liter capacity)
* Breathable cloth cover (cheesecloth, coffee filter, or thin towel)
* Rubber band or string
* Glass bottles with airtight seals (swing-top bottles are ideal for F2)
* Pot for boiling water
* Strainer or funnel
* Measuring cups and spoons
Ingredients for First Fermentation (F1):
* 1 cup white granulated sugar (do not reduce, it's food for the SCOBY)
* 4-6 black tea bags (or 1 tablespoon loose-leaf black tea)
* 1 cup unflavored, unpasteurized starter liquid (from a previous batch or purchased)
* 1 SCOBY (purchased online, from a friend, or grown from a store-bought bottle)
* 12-14 cups filtered water
Ingredients for Second Fermentation (F2) – Pomegranate Flavor:
* 1/2 – 1 cup fresh pomegranate juice, OR
* 1/4 – 1/2 cup fresh pomegranate arils (seeds) per 16oz bottle
* Optional: a few slices of ginger or a sprig of mint for added complexity
First Fermentation (F1): The Initial Brew
1.
Boil Water & Brew Tea: Bring about 4 cups of filtered water to a boil in your pot. Remove from heat, add the tea bags (or loose leaf tea), and steep for 5-10 minutes. The longer you steep, the stronger the tea flavor.
2.
Dissolve Sugar: Remove the tea bags and stir in the sugar until it completely dissolves. This creates a sweet tea concentrate.
3.
Cool Down: Add the remaining filtered water (8-10 cups) to the sweet tea concentrate. This helps cool it down faster. It is absolutely crucial that the tea cools down to room temperature (68-85°F / 20-29°C) before proceeding. Hot liquid will kill your SCOBY.
4.
Combine & Cover: Pour the cooled sweet tea into your large glass jar. Gently add the SCOBY and the starter liquid. The SCOBY might float, sink, or hang in the middle – all are normal.
5.
Ferment: Cover the jar opening with your breathable cloth and secure it with a rubber band. This protects your brew from contaminants while allowing airflow. Place the jar in a quiet, dark spot at room temperature, away from direct sunlight.
6.
Wait & Taste: Let the kombucha ferment for 7-14 days. The fermentation time will vary based on temperature, SCOBY activity, and your taste preference. Start tasting after 7 days by carefully inserting a straw under the SCOBY. If it's too sweet, continue fermenting. If it's too tart, it might be over-fermented. You’re looking for a balanced sweet-tart flavor.
Second Fermentation (F2): Adding Pomegranate Flavor & Fizz
Once your F1 kombucha has reached your desired tartness, it's time for the exciting part: flavoring with pomegranate!
1.
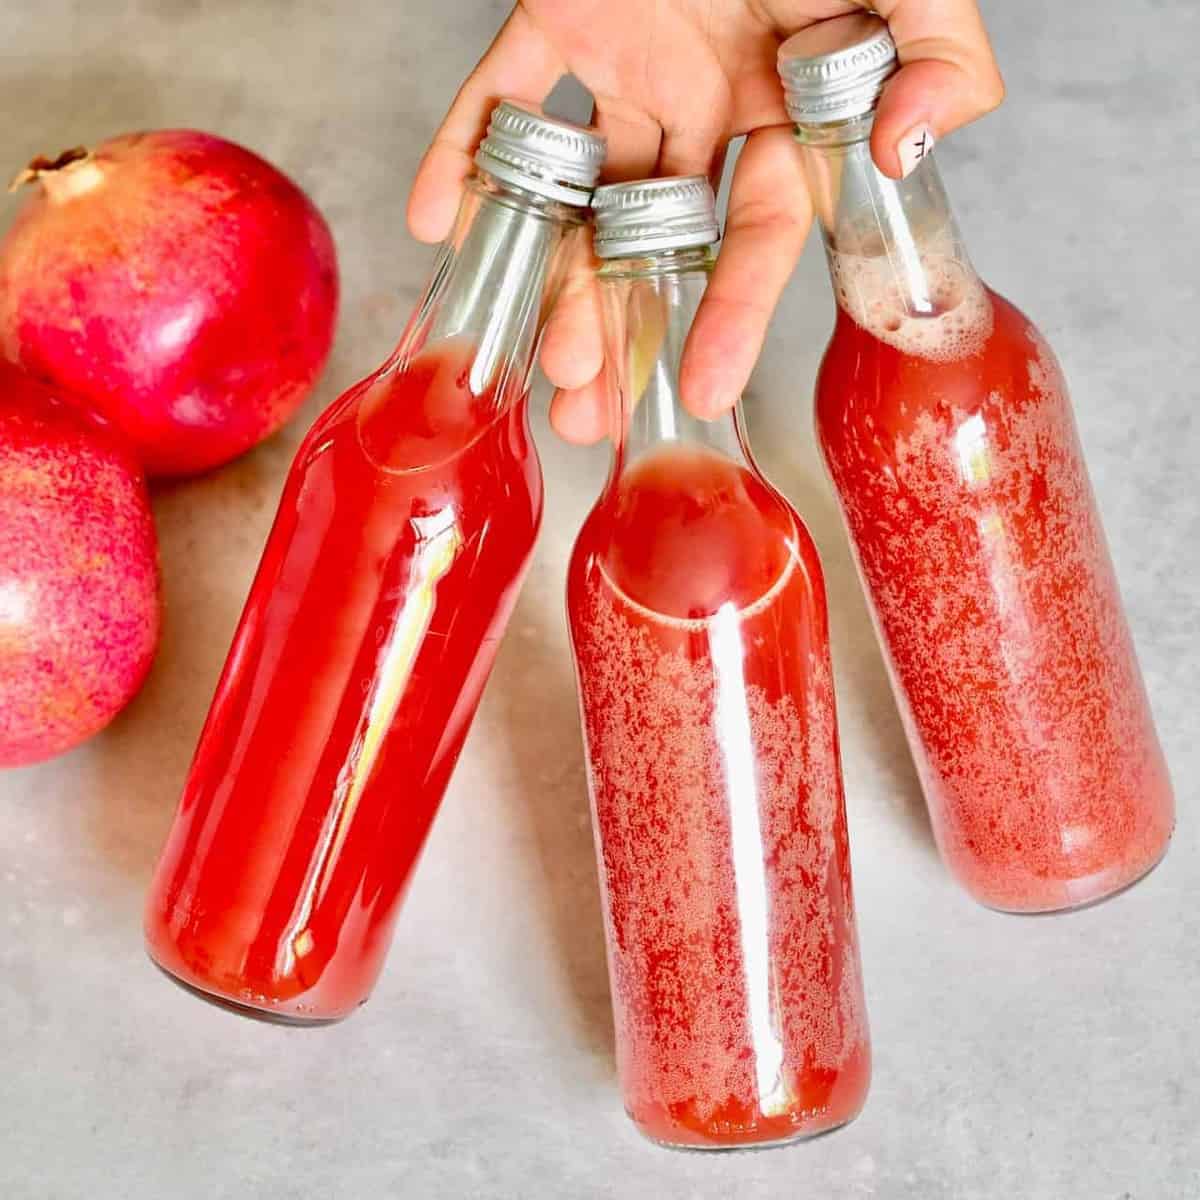
Prepare Bottles: Gather your clean, airtight glass bottles. Add your chosen amount of pomegranate juice or arils to each bottle. If using arils, gently muddle them slightly to release more juice.
2.
Bottle the Kombucha: Carefully remove the SCOBY from your F1 jar (along with about 1 cup of the fresh kombucha to use as starter liquid for your next batch). Using a funnel, pour the fermented kombucha from the jar into your prepared bottles, leaving about an inch of headspace at the top of each bottle.
3.
Seal & Ferment: Seal the bottles tightly. Place them back in your dark, room-temperature spot for another 2-4 days. This is where the carbonation builds.
4.
"Burp" & Refrigerate: After 2 days, gently open one bottle to "burp" it – release any built-up CO2. Taste it. If it’s fizzy and flavorful, move all bottles to the refrigerator to slow down fermentation and chill. If not, reseal and let it ferment for another day or two, continuing to burp occasionally. Be mindful of potential "kombucha explosions" from excessive pressure.
Troubleshooting & Tips for Success:
*
Sanitation is Key: Always use clean hands and sanitized equipment to prevent mold or unwanted bacteria.
*
Temperature Matters: Consistent room temperature (70-75°F / 21-24°C) is ideal for fermentation. Too cold and it slows down; too hot and it can ferment too quickly or risk contamination.
*
Distinguishing Mold from SCOBY Bits: Mold will typically be fuzzy, dry, and appear on the surface in distinct circular patches, often green, black, or white. A healthy SCOBY might have brown stringy bits or dark spots, which are normal yeast formations. If you see fuzzy mold, unfortunately, you must discard the entire batch and SCOBY.
*
Patience, Young Brewer: Don't rush the process. Let your SCOBY do its work.
*
Experimentation: Once you've mastered the basics, feel free to experiment with other fruit juices, herbs, or spices in F2.
* For a deeper dive into common questions and advanced tips, our article
Master Pomegranate Kombucha: Your Easy Guide to Home Brewing offers more valuable insights.
Conclusion
Brewing your own
pomegranate kombucha is a rewarding journey that connects you directly to the source of your gut-friendly beverages. Not only do you get to enjoy a delicious, custom-flavored drink that surpasses store-bought options in freshness and vitality, but you also gain the satisfaction of creating something wonderful with your own hands. By following these simple steps, you'll soon be enjoying sparkling, tangy, and invigorating
homemade kombucha DIY pomegranate batches, knowing exactly what goes into every healthy sip. So go ahead, embrace the brewing adventure – your gut will thank you!